

Silicone Brake Pads Yoyo Trick Core
Learn how to make custom silicone brake pads using clear flowable silicone.
Yoyo In This Video:

Silicone Brake Pads Yoyo TrickIn this video I am going to teach you how to silicone the brake pad recesses of your yoyos. What I mean by that is: you are going to take your yoyo right apart, you are going to pull your brake pads out and in place of the brake pads you are going to pour this clear flowable silicone – it’s important that that is the kind that you use – right into this brake pad recess area. When that hardens it is going to give you a silicone brake pad that is perfectly fitted to your yoyo.
There are a couple of advantages to doing this. The first one is that the brake pad is going to be perfectly fitted to your yoyo, like I said. This means it is going to be perfectly flat and even with the side of your yoyo. What that will mean is that the string is never going to hit it while it is spinning and it won’t hit it until you pull the yoyo back up. It is actually going to increase the spin time of your yoyo. And, because it is perfectly fitted, what that also means is that it is going to be quite a bit more consistent than the foam brake pads that actually come on the yoyo. Because of its rubbery texture it is also going to be more responsive than the brake pads are which is going to make it a whole lot easier to learn your looping tricks but it is also going to make just about all of your tricks easier to learn.
Those are just a couple of reasons. The other is that the silicone really lasts a long time. If you get sick of trying to swap these out or if you feel like they are just wearing out too fast and you don’t know what to do about it you put this in and it will last probably a month or two months; I’ve seen it last even longer. Some people they seem to really have a knack for it. So I am going to show you the best way that I know how to do it. Hopefully this will really help you out.
The first thing you need to do is you need to remove this old brake pad. I’ve gotten a couple of emails from people that say they are having a really hard time with getting these old foam brake pads out so I am going to show you the way that I do it. The first thing that you want to do is use your thumbnail and just kind of pull it away from the side just a little bit so that you can actually pinch it and lift it up. Once you’ve done that you want to pull it away from the side of the yoyo very slowly. The key is to pull very slowly. When you do that it is going to come off in one piece and it is also going to pull off all of the glue that is attached to this old brake pad. That’s going to make this silicone a lot easier to put in. So you see it just comes off in one piece, no big deal; it doesn’t take that long. Once you have done that just set it off to the side.
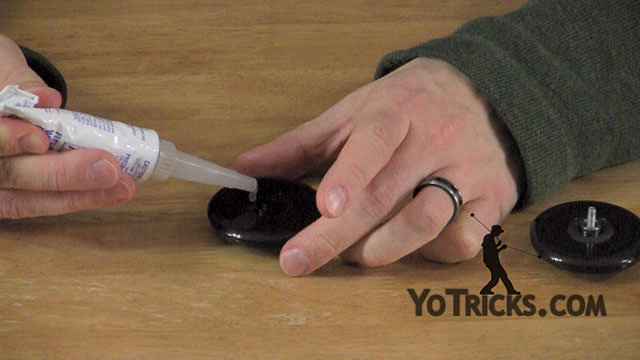
Next, you want to get your flowable silicone; I’ve already used this one so I am not going to punch a hole in the top, but you will have to do that when you take your off for the first time. Take off the cap and try not to get it all over the place and put on its applicator right here. One thing that I have done with the applicator is I have actually taken a pair of scissors and I have cut off the first one or two segments right at the top here. What that will do is it will open this hole up just a little bit wider because this area here that you have to fill it requires quite a bit of silicone; that will help you apply it faster and it will just make it a whole lot easier in general.
Once you have your applicator on you are going to want to squeeze the silicone right into it – get your yoyo all set up – and just squeeze the silicone right into the brake pad area. Since this is flowable silicone what that means is that it will level itself out. The most important part is not that you necessarily get it everywhere evenly but that you do not get it anywhere that you don’t want it. If you do you are going to have to wipe it off and that is a little bit of a headache, but you can totally do it. The other thing you can do that I have seen a whole lot of guys do is they just put a knife to it afterwards and they kind of clean it up. If you do this just right you won’t have to do any of that. You can just get it all right inside the yoyo and that will work out perfectly.
Once you have laid it on the inside what you really want to do is fill it up completely, but you don’t want to over fill it. If you over fill it then it will form a little ridge and that will make your yoyo not work so consistently and it will be a little bit frustrating. If you can fill it up so that it is perfectly level with the surface of the yoyo then that is the best thing. I’m not sure if you can see it but it is already leveling itself out. As the yoyo is sitting the most important thing is that you have found a perfectly level surface for it to settle. If it settles lopsided then it is going to throw all of your yoyoing off which will be pretty frustrating. I actually set the yoyo on this part, on the outer edge I set it up high, I get two boxes and just set it there to make sure that it is perfectly flat.
That’s really it. Once you have poured it in there you can check to see that it is level, I did a pretty good job on this one. Once it is done it takes about 12 to 24 hours to set. And you can see that in both of these the silicone looks pretty much the same. You may think that your yoyo hasn’t actually dried, but if you touch it you will see that it has dried and it has a nice gummy texture which is exactly what you want.
For the Dominators, as I have already mentioned, you want to try and make it perfectly level with the side of the yoyo because that will help with your looping quite a bit. For the Luminators I actually let it sit down a little bit lower. I don’t quite fill it up as high. I have just found that I like that better. You can experiment and see how you like it.
The last thing that you may want to be aware of is as you are using this over time the inside surface of these brake pad recesses is very smooth and so the silicone doesn’t always want to stick to it while it is being responsive with the string and it may start to pull away. If it does that is going to interfere with your yoyoing. What I do sometimes, if it does start to pull away, is I pull the entire bit of silicone out. You can see that it just makes a little doughnut that is exactly the size of the recess. This is the exact silicone that you poured in. In order to get this back into the yoyo, instead of just setting it in because it is just going to come right back out, I actually get just a little bit of Krazy Glue and I just put four dots, one on each corner, and I put the brake pad right back in exactly the way it came out. Then I squish it down so that it is even with the surface of the yoyo again. That super glue is going to hold it in there, it is going to be fantastic, and it will just last a really long time.
So far I have found no better way to make these yoyos as responsive as you want. Like I said, the silicone, it really lasts a long time. That gummy texture is going to work really well for you whether you are looping or doing your string tricks.
Give it a shot, let me know how it works out. That is how you silicone your brake pads in your yoyos.
There are no yoyo tricks you need to know before learning this trick with your yoyo.